DHP Quick Start
A locally built Docker debugging environment, simulating nhp-server, nhp-db and nhp-agent. This environment can be used for:
- Quickly understanding how opendhp works
- Basic logic validation
1. Overview
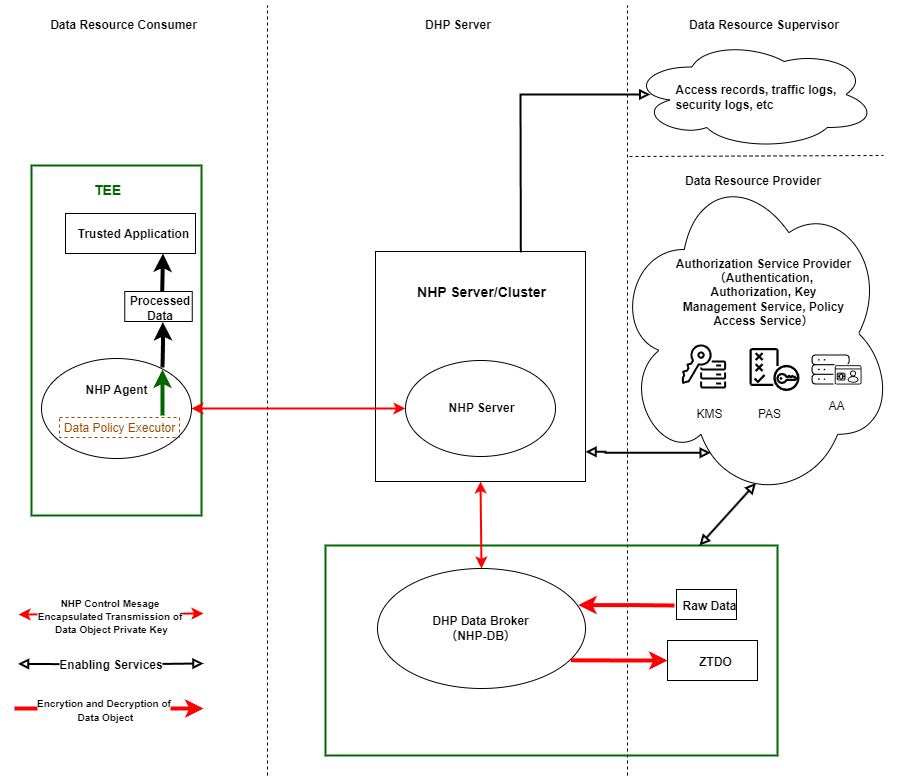
The primary purpose of OpenDHP is to enforce data sovereigenty, ensure data invisibility while maintaining availability, and uphold data privacy throughout the entire data lifecycle.
This Quick Start guide helps developers rapidly set up the OpenDHP Docker environment, build the source code, and test key features of OpenDHP. The environment is designed to be lightweight and easy to use, making it ideal for developers who want to quickly test and debug OpenDHP.
1.1 Architecture
1.1.1 Network Topology
| Container Name | IP | Description |
|---|---|---|
| NHP-Agent | 177.7.0.8 | Runs nhp-agentd. Port mapping: 443→Host: 8443 |
| NHP-Server | 177.7.0.9 | Runs nhp-serverd with exposed port 62206 |
| NHP-DB | 177.7.0.12 | Runs nhp-db. Used to publish data |
1.2 Test Scenario
1.2.1 Scenario Description
To enhance the comprehensiveness and accuracy of identifying risk-involved accounts, in addition to internal risk-control identification, banks can also conduct joint verification by using the information of risk-involved accounts provided by other banks, payment institutions, public security departments, or regulatory platforms. To ensure data security and user privacy, all participating parties use confidential computing technology to collaboratively determine whether a certain account has risk-related behaviors, thus avoiding the direct exposure of user data in plaintext.
1.2.2 Scenario Architecture

2. Installing Docker Environment
For this part, please refer to the corresponding chapter in NHP Quick Start for details.
3. Running and configuring the Environment
The following startup command will build nhp-server, nhp-db, and nhp-agent images during the startup process.
3.1 Start All Services
cd ./docker
docker compose -f docker-compose.dhp.yaml up -d
3.2 Start nhp-agent with DHP mode
Since nhp-agent does not start by default, you need to start it manually.
docker exec -it nhp-agent /bin/bash
/nhp-agent/nhp-agentd dhp
3.3 Start nhp-db
Since nhp-db does not start by default, you need to start it manually.
docker exec -it nhp-db /bin/bash
/nhp-db/nhp-db run
3.4 Configure DHP-related parameters
Since agent and tee key is generated during the 1st startup, you need to configure agent public key in nhp-server for trustworthiness, tee public key in nhp-db for trustworthiness. In addition, you need to configure trusted execution environment in nhp-server for appraising attestation report.
3.4.1 Configure agent public key in nhp-server
With this default docker environment, 8443 port is exposed to host for nhp-agent. So, you can access nhp-agent http endpoints from host using https://localhost:8443. You can use below curl command to get agent public key.
curl --insecure https://localhost:8443/api/v1/key/agent
{"publicKey":"f+HWVbhQ6ZR3e+INU7ZSGyn3XNls5TUdbZWlPmj/1v890WLDW7RcnnbJmqqufymK+Yb99dadX+PlhK4qFYxtOg=="}
Next, you need to configure agent public key in nhp-server.
docker exec -it nhp-server /bin/bash
vi /nhp-server/etc/agent.toml
# list the agent peers for the server under [[Agents]] table

# PubKeyBase64: public key for the agent in base64 format.
# ExpireTime (epoch timestamp in seconds): peer key validation will fail when it expires.
[[Agents]]
PubKeyBase64 = "f+HWVbhQ6ZR3e+INU7ZSGyn3XNls5TUdbZWlPmj/1v890WLDW7RcnnbJmqqufymK+Yb99dadX+PlhK4qFYxtOg=="
ExpireTime = 1924991999
After configuring the agent public key, you can check agent status with the following curl command:
curl --insecure https://localhost:8443/api/v1/status/agent
{"attestationVerified":false,"running":true,"trustedByNHPDB":false,"trustedByNHPServer":true}
You will see that trustedByNHPServer is true which means the agent is trusted by the NHP server.
3.4.2 Configure TEE attestation in nhp-server
You can use below curl command to get TEE attestation report.
Notes: The attestation report is generated according to container information in non-TEE environment, non-TEE environment is only for test purpose.
curl --insecure https://localhost:8443/api/v1/attestation/tee
{"measure":"3460bc69b9d273ad15c91074d8fd41abc5d5ccac50730d2e0495d08558848e34","serial number":"3460bc69b9d273ad15c91074d8fd41abc5d5ccac50730d2e0495d08558848e34"}
Next, you need to configure attestation in nhp-server.
docker exec -it nhp-server /bin/bash
vi /nhp-server/etc/tee.toml
# list trusted execution environments under [[TEEs]] table

# Measure: cryptographic hashes that ensure the integrity of software and data within the TEE.
# SerialNumber: unique serial number of the TEE.

[[TEEs]]
Measure = "19178a674248bbca705863bbf75ecaa049fcf3dfcc5ff59a80dcc5cbb60dae59"
SerialNumber = "TMEX300023050201"

[[TEEs]]
Measure = "3460bc69b9d273ad15c91074d8fd41abc5d5ccac50730d2e0495d08558848e34"
SerialNumber = "3460bc69b9d273ad15c91074d8fd41abc5d5ccac50730d2e0495d08558848e34"
After configuring the agent public key, you can check agent status with the following curl command:
curl --insecure https://localhost:8443/api/v1/status/agent
{"attestationVerified":true,"running":true,"trustedByNHPDB":false,"trustedByNHPServer":true}
You will see that attestationVerified is true which means TEE is trusted by the NHP server.
3.4.3 Configure TEE public key in nhp-db
You can use below curl command to get TEE public key.
curl --insecure https://localhost:8443/api/v1/key/tee
{"publicKey":"pup5OzTTZjddv+WBgbUBkvHuBgJoBg0DU+I2c7Qj4lHlrVM8N/Yl9F6DEnbGFBWB89xrN6VLhYAIM4Xv+mu4KA=="}
Next, you need to configure TEE public key in nhp-db.
docker exec -it nhp-db /bin/bash
vi /nhp-db/etc/tee.toml
# Configuration for trusted execution environment.

# TEEPublicKeyBase64: base64 encoded public key of TEE (Trusted Execution Environment).
[[TEEs]]
TEEPublicKeyBase64 = "pup5OzTTZjddv+WBgbUBkvHuBgJoBg0DU+I2c7Qj4lHlrVM8N/Yl9F6DEnbGFBWB89xrN6VLhYAIM4Xv+mu4KA=="
ExpireTime = 1924991999
4. Testing with risk-involved account scenario
4.1 Publishing data resource
You can publish a data resource with the following command:
docker exec -it nhp-db /bin/bash
cd /nhp-db
./nhp-db run --mode encrypt --data-source-type online --source ./demo/risk.involved.accounts.csv --output ./risk.involved.accounts.csv.demo.ztdo --smart-policy ./demo/smart.policy.json --metadata ./demo/metadata.json
If the message Successfully register or update data object which doId is <doId>. is printed, it means the data resource has been published successfully.
4.2 Requesting data resource
4.2.1 Write and Compile trusted application
To enable easy and unified communication with the trusted application, we use the Model Context Protocol (MCP). This means the trusted application is implemented as an MCP server, while the client, built into the NHP Agent, acts as the MCP client to communicate with the trusted application. Since the MCP framework is supported by almost all programming languages, implementing a trusted application in any language is easy and straightforward.
Following is a simple example of a trusted application written in Golang, and it is used in this demonstration.
package main

import (
	"context"
	"encoding/csv"
	"fmt"
	"io"
	"os"

	"github.com/mark3labs/mcp-go/mcp"
	"github.com/mark3labs/mcp-go/server"
)

func main() {
    s := server.NewMCPServer("trusted application", "1.0.0",
        server.WithToolCapabilities(true),
    )

    s.AddTool(
        mcp.NewTool("verify_account",
            mcp.WithDescription("Verify account to check whether there are any risk factors associated with the account"),
            mcp.WithString("path",
                mcp.Required(),
                mcp.Description("path to file which records the account details"),
            ),
            mcp.WithString("account_id",
                mcp.Description("account id"),
				mcp.Required(),
            ),
        ),
        verifyAccountHandler,
    )

    // Start STDIO server
    if err := server.ServeStdio(s); err != nil {
        fmt.Fprintf(os.Stderr, "Server error: %v\n", err)
        os.Exit(1)
    }
}

func verifyAccountHandler(ctx context.Context, req mcp.CallToolRequest) (*mcp.CallToolResult, error) {
    path, err := req.RequireString("path")
    if err != nil {
        return mcp.NewToolResultError(err.Error()), nil
    }

    accountId, err := req.RequireString("account_id")
    if err != nil {
        return mcp.NewToolResultError(err.Error()), nil
    }

	is_risk, err := findRecord(path, accountId)
	if err != nil {
		return mcp.NewToolResultError(err.Error()), nil
	}

    return mcp.NewToolResultText(fmt.Sprintf(`{"account_id":"%s","is_risk": %t}`, accountId, is_risk)), nil
}

func findRecord(path string, accountId string) (bool, error) {
	f, err := os.Open(path)
	if err != nil {
		return false, err
	}
	defer f.Close()

	r := csv.NewReader(f)
	r.Comma = ','

	for {
		record, err := r.Read()
		if err != nil {
			if err == csv.ErrFieldCount {
				continue
			}

			if err == io.EOF {
				return false, nil
			}

			return false, err
		}

		if record[0] == accountId {
			return true, nil
		}
	}
}
Suppose we have built it as binary which name is ta.
4.2.2 Register trusted application
You can use following command to register trusted application:
curl --insecure --request POST --url https://localhost:8443/api/v1/ta/register --header 'content-type: multipart/form-data' --form file=@ta --form 'description=trusted application demo'
[
  {
    "method": "POST",
    "name": "/api/v1/ta/ceca4572-644b-4bde-a4b6-ac6048f8fba6/verify_account",
    "description": "Verify account to check whether there are any risk factors associated with the account",
    "params": [
      {
        "name": "doId",
        "description": "identifier of the data object",
        "type": "string"
      },
      {
        "name": "account_id",
        "description": "account id",
        "type": "string"
      }
    ]
  }
]
After success registration, you can get the HTTP RESTful API which is exposed by trusted application.
4.2.3 Execute task
You can invoke those exposed RESTful API to perform privacy-preserving compututation using following curl command:
curl --insecure --request POST --url https://localhost:8443/api/v1/ta/ceca4572-644b-4bde-a4b6-ac6048f8fba6/verify_account --header 'content-type: application/json' --data '{"doId": "47d2b67c-ef80-45fc-814d-effd23baf788", "account_id": "62230121012345678901"}'
After execution, you will get response {"account_id":"62230121012345678901","is_risk":false} which means the account is not a risk-involved account.
Since the NHP Agent, the trusted application, and the data are all protected by a Trusted Execution Environment (TEE), the data resource consumer CAN NOT access the data resource directly. Instead, all interactions with the data MUST go through controlled and verified execution within the TEE, ensuring that the data remains confidential and is only processed according to the associated smart data policy. Then entire design of DHP guarantees that the consumer can use the data without ever seeing or extracting the raw content.