OpenNHP Plugin Development Guide
Table of Contents
Introduction
Plugins in the NHP server are modules that add specific features to the main application. They are designed to be highly modular and loosely coupled with the core application, allowing developers to add, remove, or update plugins without affecting the main functionality of the server.
1. The Necessity of Applying OpenNHP Plugins
The development of OpenNHP plugins solves the compatibility issues between the UDP protocol and web-based HTTP requests, while also addressing the customization needs for authentication in government platforms. Developing plugins is crucial for further extending the NHP framework and adapting it to the flexible needs of government data flow applications. The reasons are as follows:
1.1 Protocol Compatibility and Technical Limitations
The NHP standard protocol communicates over the UDP protocol, which is lightweight and fast, making it suitable for large-scale, high-frequency data transmissions. However, in certain scenarios, especially web-based interactions (e.g., HTML5 web pages), JavaScript running in a browser can only make HTTP requests and cannot directly send UDP requests. This creates a protocol incompatibility issue. Many modern government applications rely on web interactions, making plugin development essential to overcome this technical limitation.
By developing OpenNHP plugins, the NHP server can receive HTTP requests from web clients (often “knock packets”) and convert them into the UDP protocol needed for internal communication. This mechanism ensures seamless integration between web applications based on HTTP and the NHP server, extending the NHP framework’s application scope. It particularly enhances flexibility and compatibility in data transmission in scenarios involving browser-to-backend service interactions.
1.2 Customization Needs for Authentication
Government data flow involves highly secure identity authentication and access management. However, standard authentication protocols cannot meet the complex needs of government scenarios. Different government platforms have their own authentication mechanisms and demand highly customized authentication processes. Traditional standard protocols are too rigid to flexibly integrate with these platforms.
OpenNHP plugins can interface with different government platforms by offering custom services to accommodate their authentication processes. The plugins allow developers to tailor the authentication mechanisms according to the specific requirements of different platforms, ensuring seamless integration with the NHP framework. This not only enhances authentication security but also ensures compliance and flexibility in data flow management.
2. How the Plugin Works
The entire plugin execution process covers the complete flow from user requests, server plugin parsing, plugin logic execution, to final feedback to the user. Each step ensures that the NHP server, via the plugin, meets the demands of various request processing scenarios, especially in authentication and “knock packet” handling.
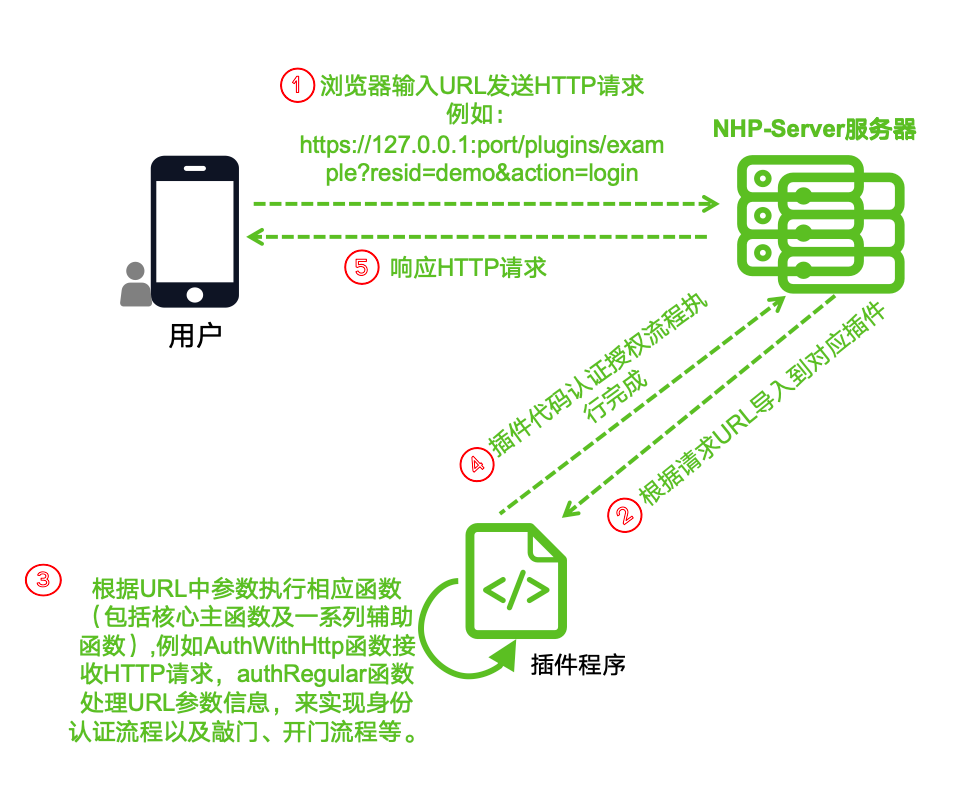
Figure 1: Plugin Workflow Diagram
2.1 User Initiates an HTTP Request via Browser
The user inputs a specific URL address in their browser, sending an HTTP request to the NHP server. For example, a user accesses the following URL:
http://127.0.0.1:port/plugins/example?resid=demo&action=login
This is the starting point of the entire process, typically initiated by a webpage or application request that needs to be handled by the plugin.
| URL Component | Description |
|---|---|
127.0.0.1:port | The first part is the IP address of the NHP server, followed by the port number |
plugins | Plugin directory |
example | Plugin name |
resid | Plugin resource ID |
action | The action to be executed, used to determine which auxiliary function the plugin performs |
Table 1: URL Component Breakdown
2.2 NHP Server Parses the URL and Calls the Appropriate Plugin
After the HTTP request reaches the NHP server, the server parses the URL path and parameters to determine which plugin to call. During this process, the NHP server identifies the plugins/example part of the URL and routes the request to the “example” plugin for processing.
2.3 The Plugin Executes Core Functionality
Based on the parameters in the URL (such as resid=demo and action=login), the plugin executes the corresponding functionality. The core functions of the plugin include authentication and a series of “knock packet” processing steps. The core functionality handles the main logic, while auxiliary functions provide support for tasks such as authentication and resource access.
2.4 Plugin Completes the Code Execution Process
After processing the request and completing the authentication or other custom services, the plugin finishes its code execution process. This step is key to the core functionality of the plugin, where all authentication, authorization, or other logic is executed.
2.5 NHP Server Responds to the User with the HTTP Request Results
Once the plugin finishes its process, the result is sent back to the NHP server, which responds to the user via HTTP. The user will eventually see a feedback message in their browser, such as a confirmation message or relevant data or page update.
3. Plugin Development Principles
3.1 Environment Setup
Before developing OpenNHP plugins, ensure the following environment is properly set up:
- Development Language: Go language is used for development.
- Development Tools: IDEs like IntelliJ IDEA or VS Code are recommended.
- OpenNHP source code: Download and integrate the latest version of the OpenNHP code from GitHub into your development environment. Download URL: https://github.com/OpenNHP/opennhp.
3.2 Project Initialization
First, create a new plugin project under the server/plugins directory. For example, let’s create a plugin named “example.”
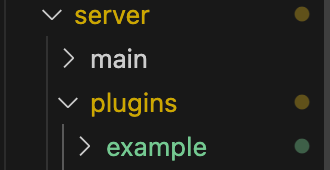
Figure 2: Example Plugin Parent Directory
Each plugin in the NHP server is typically structured as a separate Go package. For instance, the “example” plugin would be located in the NHP/server/plugins/example directory and would have its own example.go file.
The initialized project structure includes basic configuration files and the plugin framework, primarily consisting of the etc directory with configuration files (config.toml, resource.toml), the main program file main.go, and the automation build file Makefile. If the plugin requires integration with front-end pages, the templates directory and corresponding front-end HTML files can also be added.
A typical plugin file, such as example.go, contains the following:
- Necessary import statements
- Constants and variables related to the plugin
- Helper functions
- Main plugin function
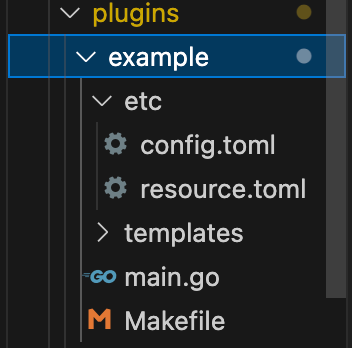
Figure 3: Example Plugin Directory Structure
| File/Directory Name | Purpose |
|---|---|
| etc | Contains configuration and resource files for the plugin |
| config.toml | Defines configuration details for the plugin during runtime |
| resource.toml | Defines resource-related information for the plugin |
| templates | Stores integrated front-end page templates (optional) |
| main.go | Main program file defining core functions and helper logic |
| Makefile | Automation build file |
Table 2: Plugin Directory and File Purposes
3.3 Plugin Function Design
In the plugin function design phase, the following core points need to be clarified:
Data Flow Scenarios: Define the participants, permissions, and flow paths involved in the data circulation process.
Security Policies: Establish strict access control and verification mechanisms through a zero-trust architecture.
Logging and Auditing: Design comprehensive logging functionalities for subsequent tracing and auditing.
For example, the main functionality to be implemented by the “example” plugin is as follows:
Submit a form containing user name and password on the H5 page;
The NHP-Server server receives the form for verification. After the verification is successful, it initiates a knock on the NHP-AC server;
After NHP-AC successfully opens the door, it returns the application server address to the client;
Access application server resources.
3.4 Core Code Development
The steps for developing the plugin for the NHP server are as follows:
Create a new directory for your plugin under NHP/server/plugins. The directory name should be the name of your plugin.
In the plugin directory, create a new Go file. The file name should be the same as the directory name. For example, for a plugin named myplugin, you would create a file named myplugin.go.
Define your plugin functions. Your plugin should have at least one main function that executes the core functionality of the plugin. You can also define auxiliary functions as needed.
Import your plugin in the main application. In the main application file (main.go), import your plugin package and call your plugin functions as needed.
Refer to the plug-in function design for code development. Taking the “example” plug-in as an example, the AuthWithHttp function is designed to receive and process HTTP requests, the authRegular function verifies the user name and password and knocks on the door, the authAndShowLogin function loads login page resources, etc., and verification auxiliary functions need to be designed to implement the functions. Expansion and development can be carried out according to specific functional requirements.


Figures 4, 5, 6 Example Plugin Core Code and Auxiliary Code Function Example
3.5 Plugin Compilation Testing and Deployment
Testing and deployment of the plugin are crucial steps to ensure the completeness and stability of plugin functionality. Through local environment testing and optimization, developers can deploy the plugin in a way that ensures the correctness of its functionality. In the production environment, the plugin must be accurately configured, combined with security and operation strategies, to ensure that it meets business needs and runs stably in real applications. The specific steps are as follows:
1. Plugin Compilation
The compilation process ensures that the plugin’s code is consistent with the main project, while the task dependencies in the Makefile ensure that the plugin’s build process is closely integrated with the main system’s compilation, achieving an integrated build and release process. The specific steps are as follows:
Define Plugin Directory: At the top of the Makefile, we can see a line of code defining the plugin directory, as shown in the image below:
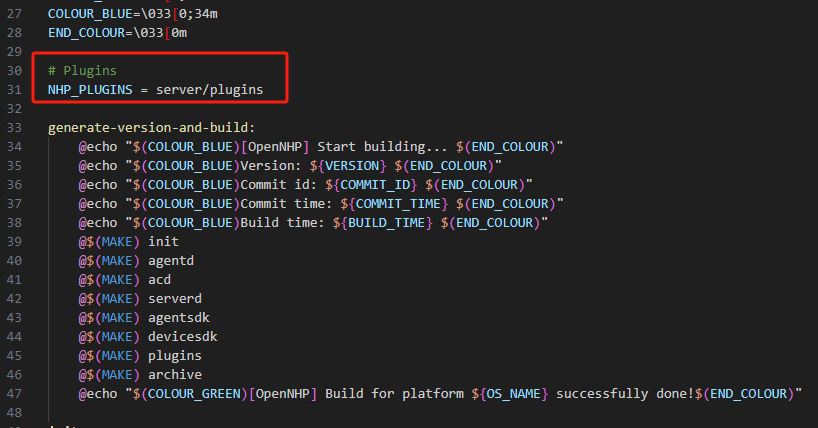
Figure 7 Define Plugin Directory
This line of code specifies the storage location of the plugin, which is the server/plugins directory. All plugin source codes and configuration files will be placed in this directory. When starting the NHP service, to ensure the plugin loads correctly, the plugin file path needs to be configured in the NHP-Server’s etc/resource.toml configuration file.
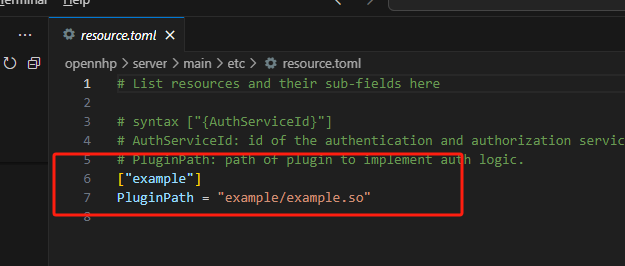
Figure 8 Plugin File Path Configuration
Generate Version Information and Start Build: The generate-version-and-build task includes a series of steps to generate version numbers, commit IDs, build times, and other information. This information is helpful for tracking the version and build status of the plugin.
Plugin Compilation Logic: In the Makefile, the plugins: task is responsible for executing the plugin compilation, as shown in the image below:
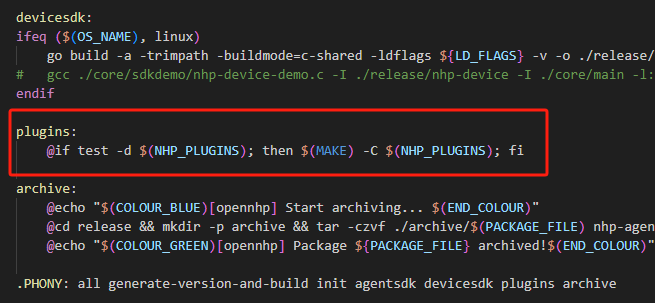
Figure 9 Plugin Compilation Task plugins
Plugin Directory Check: test -d $(NHP_SERVER_PLUGINS) checks if the defined plugin directory (server/plugins) exists.
Execute Compilation: If the plugin directory exists, $(MAKE) -C $(NHP_SERVER_PLUGINS) enters that directory and executes the Makefile within it, performing the compilation operation for the plugin.
Overall Compilation Process: During the overall project build process (Linux and macOS: run the script make in the root directory; Windows: run the BAT file build.bat in the root directory), the plugins task in the Makefile will be called. If the plugin directory exists and is valid, the plugin’s Makefile will be executed to complete the plugin’s build. During compilation, plugin binary files or other forms of output files may be generated for use by the NHP server.
2. Local Environment Function Testing
To test your plugin, you can write a separate _test.go file in the same directory as the plugin file to write unit tests. Go’s built-in testing package (testing) can be used to write and run tests.
Once the plugin development is complete and compiled successfully, it is necessary to perform functional testing in the local environment first. This step is primarily used to verify whether the core functionality of the plugin has been correctly implemented and to ensure that all functional modules of the plugin are working correctly. You can simulate actual application scenario requests to verify whether the plugin’s response meets expectations and check the logs for potential issues. Common testing steps include:
Initiate HTTP or UDP requests to test the plugin’s response;
Verify whether the identity authentication, knocking, opening, and authorization processes in the plugin are executed as expected;
Test the plugin’s error handling and exception capture mechanisms;
During the local testing phase, developers can use debugging tools, logging, and breakpoint debugging to thoroughly investigate and resolve potential issues in the code, ensuring the logic of the plugin is rigorous and free of major vulnerabilities.
3. Function Confirmation and Optimization
After local environment testing passes, developers need to confirm and optimize the plugin’s functionality. Confirm whether the core functions of the plugin fully meet the description in the requirements document, and whether all expected functionalities have been correctly implemented. If certain functions of the plugin are found to be below expectations or have further optimization potential during testing, code adjustments and functionality optimizations can be made based on the test results.
4. Configuration and Deployment in Actual Application Scenarios
Once local testing and optimization are complete, the plugin can proceed to the deployment phase in actual application scenarios. To deploy your plugin, simply build and run the main application. Your plugin will be included in the build and will be available when the server runs. During plugin deployment, it is usually necessary to configure according to the specific needs of the application scenario. The specific steps are as follows:
Deployment Environment Preparation: Ensure that the server configuration in the production environment is consistent or close to that of the local testing environment, including the operating system, network configuration, dependency libraries, etc.
Plugin Installation and Configuration: Deploy the tested plugin code to the production server, configuring it according to the requirements of the actual application scenario, including plugin paths, interface addresses, access control server addresses, authentication mechanisms, etc.
Logging and Monitoring Setup: After deployment, improve log level configuration to facilitate timely detection and resolution of issues during actual application.
Start NHP Service to Check Plugin Loading Status: Start the NHP service according to the NHP service startup process, check the plugin loading status based on the log files in the log directory, and verify whether the plugin functions normally according to the local plugin testing process.
5. Production Environment Validation and Maintenance
After the plugin deployment is complete, it is necessary to validate its functionality in the actual application environment to ensure that the plugin works correctly in the production environment. After the plugin goes live, regular maintenance should also be carried out to continuously monitor the plugin’s performance, record operation data, and timely perform necessary updates and maintenance to ensure that the plugin remains in optimal condition during long-term use.
Conclusion
Developing plugins for the NHP server can extend the server’s functionality in a modular and maintainable way. By following the steps outlined above, you can create your own plugins and contribute to the NHP server project.